Table of Contents
User-specific boot menus
This page outlines the steps I took to implement a proof of concept comprising user authentication at preboot time and dynamically generated boot menus. The user is first presented with a login screen. The user's credentials are passed via an SSL-encrypted link to a server, which authenticates the user and then provides a boot menu containing a list of authorised boot selections. The list of boot selections can vary according to the user.
Setup (boring part)
Find a suitable Apache web server, complete with valid SSL certificate. Create a directory called “boot” on this web server. For the purpose of this documentation, I will assume that the full URI for this directory is http://my.web.server/boot.
In the “boot” directory, create a file “.htaccess” containing
SSLRequireSSL
You must choose between being able to load vesamenu.c32 directly and loading the current version of vesamenu.c32.
vesamenu.c32 current
The current version of vesamenu.c32 can not be loaded directly from gPXE and requires PXELINUX as an intermediate layer. You will need two PHP files, a boot.php containing
<?php

header ( "Content-type: text/plain" );
echo "#!gpxe\n";

$proto = "https";
// Comment out/remove the following if strictly using HTTPS
if (!isset($_SERVER["HTTPS"]))
  $proto = "http";

// This assigns the host that gPXE should use using the most logical variables
if ( $_SERVER["HTTP_HOST"] != "" ) {
  $host=$_SERVER["HTTP_HOST"];
} else {
  if ( $_SERVER["SERVER_NAME"] != 0) {
	$host=$_SERVER["SERVER_NAME"];
  } else {
	$host=$_SERVER["SERVER_ADDR"];
  }
}

// Comment out/remove the following if you are running on a standard port
if (!((! isset($_SERVER["HTTPS"]) ) && ($_SERVER["SERVER_PORT"] == 80))
  && !(isset($_SERVER["HTTPS"]) && ($_SERVER["SERVER_PORT"] == 443)) ){
    if (strrpos($host, ":") == FALSE)
      $host=$host.":".$_SERVER["SERVER_PORT"];
}

$uri=$_SERVER["REQUEST_URI"];
$dir=substr ( $uri, 0, strrpos ($uri, "/") + 1);

echo "#!gpxe\n";
echo "imgfree\n";
echo "login\n";
echo "set 209:string bootcfg.php\n";
echo "set 210:string ".
     $proto."://\${username:uristring}:\${password:uristring}@".
     $host.$dir."\n";
echo "chain \${210:string}pxelinux.0\n";
?>
and a bootcfg.php containing
<?php

header ( "Content-type: text/plain" );

echo "UI runmenu\n\n";
echo "LABEL runmenu\n";
echo "COM32 vesamenu.c32\n";
echo "APPEND menu.php\n";
?>
Selecting this method will require that you use gpxecmd.c32 to execute gPXE commands and scripts.
vesamenu.c32 directly
You will need a file “boot.php” containing
<?php

header ( "Content-type: text/plain" );

$uri=$_SERVER["REQUEST_URI"];
$dir=substr ( $uri, 0, strrpos ($uri, "/") + 1);

echo "#!gpxe\n";
echo "imgfree\n";
echo "login\n";
echo "chain ".
     "https://\${username:uristring}:\${password:uristring}@".
     $_SERVER["HTTP_HOST"].$dir.
     "vesamenu.c32 menu.php\n";
?>
In order to use vesamenu.c32 directly from gPXE, you must use Syslinux-3.86 from http://www.kernel.org/pub/linux/utils/boot/syslinux/3.xx/ and not the latest version.
Setup part 1 continued
Configure your DHCP server to hand out boot.php as the boot file, using something like (for ISC dhcpd)1):
filename "https://my.web.server/boot/boot.php";
Download the latest syslinux tarball from http://www.kernel.org/pub/linux/utils/boot/syslinux/ and extract it. Copy the files com32/menu/vesamenu.c32 and com32/modules/gpxecmd.c32 into the “boot” directory on the web server.
Setup (interesting part)
In the “boot” directory, you can now create a file called “menu.php”. This PHP script needs to generate a standard syslinux menu configuration file; the resulting menu will be displayed to the user.
The PHP script will have access to the plaintext of the username and password (in the variables $_SERVER["PHP_AUTH_USER"] and $_SERVER["PHP_AUTH_PW"]). Although the script has access to the plaintext, the traffic over the wire was encrypted with SSL and so is (nominally) not vulnerable to eavesdropping.
You can implement any kind of policy that you like with the script. Here is a trivial proof-of-concept example:
  <?php

  header ( "Content-type: text/plain" );

  $username = $_SERVER["PHP_AUTH_USER"];
  $password = $_SERVER["PHP_AUTH_PW"];

  $index = 0;

  function title ( $title ) {
    global $username;
    echo "menu title ".$title;
    echo ( $username ? " for ".$username : "" )."\n";
  }

  function label ( $label ) {
    global $index;
    $index++;
    echo "label item".$index."\n";
    echo "  menu label ";
    echo "^".( ( $index < 10 ) ? $index :
               sprintf ( "%c", $index + ord ( 'A' ) - 10 ) )." ";
    echo $label."\n";
  }

  function sanboot ( $label, $root_path ) {
    label ( $label );
    echo "  kernel gpxecmd.c32\n";
    echo "  append sanboot ".$root_path."\n";
    echo "\n";
  }

  function uriboot ( $label, $uri, $args ) {
    label ( $label );
    echo "  kernel ".$uri."\n";
    if ( $args )
        echo "  append ".$args."\n";
  }

  function retry () {
    echo "label failed\n";
    echo "  menu label Authentication Failed\n";
    echo "  menu disable\n";
    uriboot ( "Try again", "boot.php", "" );
  }

  function authenticated () {
    global $username;
    global $password;

    switch ( "$username:$password" ) {
    case "mcb30:password":
    case "guest:guest":
      return 1;
    default:
      return 0;
    }
  }

  ?>

  menu background atlantis.png
  prompt 0
  timeout 100
  allowoptions 0
  menu timeoutrow 29
  menu vshift 2
  menu rows 8
  menu color title  1;36;44   #ff8bc2ff #00000000 std
  menu color unsel  37;44     #ff1069c5 #00000000 std
  menu color sel    7;37;40   #ff000000 #ffff7518 all
  menu color hotkey 1;37;44   #ffffffff #00000000 std
  menu color hotsel 1;7;37;40 #ff000431 #ffff7518 all

  <?

  title ( "Secure Network Boot" );

  if ( ! authenticated() ) {
    retry();
  } else {

    if ( $username == "mcb30" ) {

      sanboot ( "MS-DOS 6.22",
                "iscsi:chipmunk.tuntap::::iqn.2007-07.chipmunk:msdos622" );

      sanboot ( "Windows 2k3",
                "iscsi:chipmunk.tuntap::::iqn.2007-07.chipmunk:win2k3" );

    }

    uriboot ( "Linux rescue shell",
              "http://chipmunk.tuntap/images/uniboot/uniboot.php", "" );
  }

  ?>
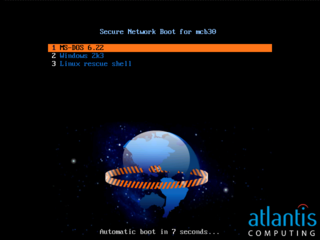
This sample script authenticates the user against a hardcoded password list and then generates a boot menu. User mcb30 will receive the option of booting MS-DOS, Windows 2003 or Linux, user guest will receive only the option of booting Linux. If authentication fails, the user is redirected back to the login screen.
Screenshots
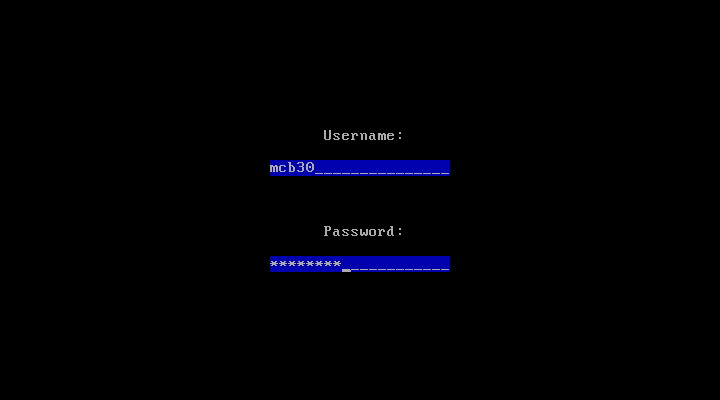
When first booting, the user sees this login screen:
After authenticating correctly as mcb30, the user sees this menu screen:
This was generated by menu.php as:
  menu background atlantis.png
  prompt 0
  timeout 100
  allowoptions 0
  menu timeoutrow 29
  menu vshift 2
  menu rows 8
  menu color title  1;36;44   #ff8bc2ff #00000000 std
  menu color unsel  37;44     #ff1069c5 #00000000 std
  menu color sel    7;37;40   #ff000000 #ffff7518 all
  menu color hotkey 1;37;44   #ffffffff #00000000 std
  menu color hotsel 1;7;37;40 #ff000431 #ffff7518 all

  menu title Secure Network Boot for mcb30
  label item1
    menu label ^1 MS-DOS 6.22
    kernel gpxecmd.c32
    append sanboot iscsi:chipmunk.tuntap::::iqn.2007-07.chipmunk:msdos622

  label item2
    menu label ^2 Windows 2k3
    kernel gpxecmd.c32
    append sanboot iscsi:chipmunk.tuntap::::iqn.2007-07.chipmunk:win2k3

  label item3
    menu label ^3 Linux rescue shell
    kernel http://chipmunk.tuntap/images/uniboot/uniboot.php
Further reading
The syntax of the generated menu files is documented within the syslinux project at http://syslinux.zytor.com/wiki/index.php/Comboot/menu.c32 and http://syslinux.zytor.com/wiki/index.php/SYSLINUX.
Future ideas
Pass-through authentication to iSCSI
If the user eventually ends up performing an iSCSI boot, gPXE will still have the user's credentials available for iSCSI authentication. If the iSCSI target could be made to authenticate against the same user database as the PHP script, this would allow for single sign-on right through to the iSCSI boot stage.
The credentials do get passed to the loaded OS via the iBFT, so we get single sign-on through to the iSCSI runtime stage for free.
For extra bonus points, it would be possible to write a Windows driver (very similar in structure to sanbootconf) that would pick up the username and password from the iBFT, and store them in the registry as the autologon credentials; this would give you single sign-on right through to the desktop. The relevant registry entries are all found in HKEY_LOCAL_MACHINE\SOFTWARE\Microsoft\Windows NT\CurrentVersion\Winlogon, and should be set as follows:
- DefaultUserName - set to user name from iBFT
- DefaultPassword - set to password from iBFT
- AutoAdminLogon - set to 1
- AutoLogonCount - set to 1, so that Windows erases2) the credentials from the registry as soon as they have been used.
Note that Windows imposes a minimum password length of 12 characters, and a maximum of 16 characters, for iSCSI authentication; this scheme will silently break unless your password policy enforces an appropriate min/max password length of 12←→16 characters.


