Table of Contents
PXE chainloading
If you have a large number of machines which already have a legacy PXE implementation (e.g. network cards containing an Intel PXE ROM), then you may want to avoid having to reflash each machine's network card. You can achieve this by placing gPXE on your TFTP server. The PXE-capable machines will download gPXE via TFTP, and instantly become gPXE-capable machines.
UNDI Driver
Universal Network Device Interface (UNDI) is an application programming interface (API) for network interface cards (NIC) used by the Preboot Execution Environment (PXE) protocol.
When chainloading gPXE from PXE, gPXE can use this API (instead of loading an hardware driver). This way, you're getting support for network controllers that are not natively supported by gPXE. some network controllers have improved performance when using the UNDI driver over the vendor specific gPXE driver (forcedeth for example).
To use the UNDI driver, select the UNDI driver (undionly) when generating the gPXE ROM.
Setting up PXE chainloading
Start by downloading the source tree, then build the PXE-chainloadable gPXE image using
  cd src
  make bin/undionly.kpxe
Copy bin/undionly.kpxe to your TFTP server, and configure your DHCP server to hand out undionly.kpxe; if you are using ISC dhcpd then you need to edit /etc/dhcpd.conf to contain
  next-server X.X.X.X;
  filename "undionly.kpxe";
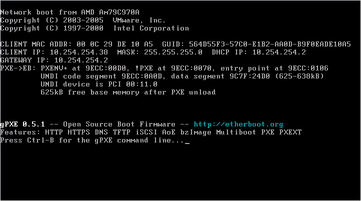
where X.X.X.X is the IP address of your TFTP server. At this point, you should be able to boot one of your PXE-capable machines, and see it download gPXE from the TFTP server. If everything has worked, then you should see the gPXE startup banner appear:
gPXE 0.9.7 -- Open Source Boot Firmware -- http://etherboot.org
Breaking the infinite loop
When the chainloaded gPXE starts up, it will issue a fresh DHCP request and boot whatever the DHCP server hands out. The DHCP server is currently set up to hand out the gPXE image, which means that you will be stuck in an infinite loop: PXE will load gPXE which will load gPXE which will load gPXE which will load gPXE…
You can break this infinite loop by configuring the DHCP server to hand out gPXE only for the first DHCP request; the second DHCP request will return the “real” boot filename.
Using ISC dhcpd
If you are running ISC dhcpd as your DHCP server, then edit /etc/dhcpd.conf to contain
  if exists user-class and option user-class = "gPXE" {
      filename "http://my.web.server/real_boot_script.php";
  } else {
      filename "undionly.kpxe";
  }
This will ensure that the gPXE image (undionly.kpxe) is handed out only when the DHCP request comes from a legacy PXE client. Once gPXE has been loaded, the DHCP server will direct it to boot from http://my.web.server/real_boot_script.php.
Using dnsmasq
Dnsmasq is a DHCP, TFTP, DNS server. Here is the configuration for chain loading gPXE.
The conf is:
  #DHCP part
  domain=mydomain
  dhcp-range=192.168.10.100,192.168.10.200,255.255.255.0,30m
  dhcp-option=option:router,192.168.10.1
  dhcp-authoritative

  # TFTP part
  enable-tftp
  tftp-root=/tftproot

  # host part, a VM that will be booted from network
  # 00:0C:29 - the MAC part of VMware vendor - we are booting a VM
  # here we chainload gPXE
  dhcp-host=00:0c:29:aa:bb:cc,gPXE-client,net:gPXE-testVM,192.168.10.100,10m
  dhcp-boot=net:gPXE-testVM,undionly.kpxe
  # for a gPXE enabled client we are asking him to boot from a image located at an URL. The image can be a gPXE script
  dhcp-userclass=gPXE-booted,"gPXE"
  dhcp-boot=net:gPXE-booted,http://my.web.server/real_boot_script.php
The file undionly.kpxe is located in the /tftproot/ folder. To build undionly.kpxe run:
  wget http://kernel.org/pub/software/utils/boot/gpxe/gpxe-1.0.1.tar.bz2
  tar jxf gpxe-1.0.1.tar.bz2
  cd gpxe-1.0.1/src
  make DEBUG=http,iscsi,tftp,dhcp bin/undionly.kpxe&&sudo cp bin/undionly.kpxe /tftproot/undionly.kpxe
Using pxelinux, menu.c32 and dnsmasq to chainload gPXE
If you want to test gPXE but you are using extensively pxelinux and you do not want to break the rest of your configuration, you can add a menu entry to load gPXE.
The /etc/dnsmasq.conf should contain something like:
  #DHCP
  domain=mydomain
  dhcp-range=192.168.10.100,192.168.10.200,255.255.255.0,30m
  dhcp-option=option:router,192.168.10.1
  dhcp-authoritative

  # TFTP part
  enable-tftp
  tftp-root=/tftproot

  # PXE
  dhcp-boot=/tftproot/pxelinux.0
  # required by old versions of gPXE (e.g. the one that comes with OracleVM)
  dhcp-no-override
The /tftproot/pxelinux.cfg/default should contain:
  DEFAULT menu.c32
  PROMPT 1

  LABEL gpxe
  MENU LABEL gPXE - chainload gPXE from a PXE capable NIC
  KERNEL undionly.0
On an Ubuntu system install syslinux package and make /tftproot/pxelinux.0 symlink to /usr/lib/syslinux/pxelinux.0.
The file /tftproot/undionly.0 is a symlink to /tftproot/undionly.kpxe.
Using the Windows DHCP server
If you are using the Windows DHCP server, then you must first define a user class for gPXE. Right-click on your DHCP server and choose “Define User Classes…”:
Click on Add… to add a new user class. Set the display name to “gPXE”, the description to “gPXE Clients”, and the ID to “gPXE”:
Right-click on Server Options and choose “Configure Options…”. On the Advanced tab, select “gPXE” from the User class drop-down list. Scroll down to option “067 Bootfile Name” and set it to “http://my.web.server/real_boot_script.php”:
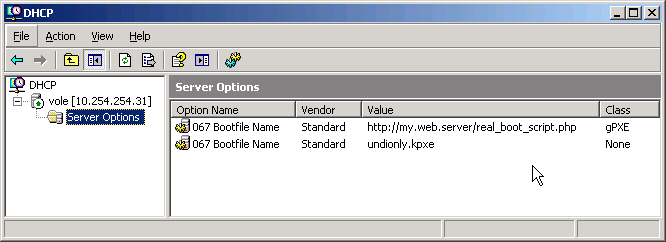
If everything has worked, then you should see two settings for “067 Bootfile Name” in your DHCP configuration: one containing “undionly.kpxe” and one containing “http://my.web.server/real_boot_script.php”:
This will ensure that the gPXE image (undionly.kpxe) is handed out only when the DHCP request comes from a legacy PXE client. Once gPXE has been loaded, the DHCP server will direct it to boot from http://my.web.server/real_boot_script.php.


