Table of Contents
Porting Windows XP, Windows 7 and Windows 2008 to New Target Hardware via SAN-Booting
Introduction
Experience the power of Free and Open-Source Software such as gPXE and the communities that develop and support such. If you can appreciate what this article accomplishes, perhaps you'd be inclined to get in the FOSS spirit and recognize the potential that can be realized with gPXE + Linux.
Here are instructions for setting up an installation of Windows XP SP2 on computer model “A” for SAN-booting the image on some other computer model “B” without performing an upgrade/repair install. Interestingly, you can use these techniques to wind up with one image that supports many different computer models either imaged to the HDD or SAN-booted with gPXE. While creeping slightly out-of-scope from being a purely gPXE SAN-booting article, some of the porting to new hardware information is included here for maximum comprehensive value.
Jan-8-2009: The article is a work-in-progress. Info about the value of using hardware profiles is still missing.
HAL & Kernel
Windows XP SP2 requires that the correct (or at least compatible) HAL and kernel be used for booting. During the porting process, it is sometimes nice to be able to choose your HAL and kernel combination at boot time, in case the combination you thought would work, doesn't.
So go into your I386 XP SP2 installation directory and perform the following commands:
D:\I386>mkdir c:\halkern\

D:\I386>expand sp2.cab -f:hal*.dll c:\halkern\
Microsoft (R) File Expansion Utility  Version 5.1.2600.0
Copyright (C) Microsoft Corp 1990-1999.  All rights reserved.

Expanding sp2.cab to c:\halkern\halmacpi.dll.
Expanding sp2.cab to c:\halkern\halaacpi.dll.
Expanding sp2.cab to c:\halkern\halacpi.dll.
Expanding sp2.cab to c:\halkern\hal.dll.
Expanding sp2.cab to c:\halkern\halsp.dll.
Expanding sp2.cab to c:\halkern\halmps.dll.
Expanding sp2.cab to c:\halkern\halapic.dll.

7 files total.

D:\I386>expand sp2.cab -f:nt*.exe c:\halkern\
Microsoft (R) File Expansion Utility  Version 5.1.2600.0
Copyright (C) Microsoft Corp 1990-1999.  All rights reserved.

Expanding sp2.cab to c:\halkern\ntkrnlmp.exe.
Expanding sp2.cab to c:\halkern\ntoskrnl.exe.
Expanding sp2.cab to c:\halkern\ntkrnlpa.exe.
Expanding sp2.cab to c:\halkern\ntkrpamp.exe.

4 files total.
This will copy all of the different HALs and kernels into the C:\halkern\ directory. Now rename the default HAL, kernel and PAE kernel in order to more accurately describe them:
D:\I386>cd /d c:\halkern\

C:\halkern>ren hal.dll halstan.dll

C:\halkern>ren ntoskrnl.exe ntkrnlup.exe

C:\halkern>ren ntkrnlpa.exe ntkrpaup.exe
Now you can copy all of these to computer model “A”'s C:\Windows\System32\ directory.
C:\halkern>copy * c:\windows\system32\
halaacpi.dll
halacpi.dll
halapic.dll
halmacpi.dll
halmps.dll
halsp.dll
halstan.dll
ntkrnlmp.exe
ntkrnlup.exe
ntkrpamp.exe
ntkrpaup.exe
       11 file(s) copied.
Now backup your BOOT.INI file:
C:\halkern>cd \
C:\>attrib -s -h -r boot.ini

C:\>copy boot.ini boot.bak
        1 file(s) copied.
And modify your BOOT.INI to provide you with the various HAL and kernel combination choices:
[boot loader]
timeout=30
default=multi(0)disk(0)rdisk(0)partition(1)\WINDOWS

[operating systems]
multi(0)disk(0)rdisk(0)partition(1)\WINDOWS="UP HALSTAN" /noexecute=optin /fastdetect /sos /kernel=ntkrnlup.exe /hal=halstan.dll
multi(0)disk(0)rdisk(0)partition(1)\WINDOWS="UP HALACPI" /noexecute=optin /fastdetect /sos /kernel=ntkrnlup.exe /hal=halacpi.dll
multi(0)disk(0)rdisk(0)partition(1)\WINDOWS="UP HALAACPI" /noexecute=optin /fastdetect /sos /kernel=ntkrnlup.exe /hal=halaacpi.dll
multi(0)disk(0)rdisk(0)partition(1)\WINDOWS="UP HALMPS" /noexecute=optin /fastdetect /sos /kernel=ntkrnlup.exe /hal=halmps.dll
multi(0)disk(0)rdisk(0)partition(1)\WINDOWS="MP HALSTAN" /noexecute=optin /fastdetect /sos /kernel=ntkrnlmp.exe /hal=halstan.dll
multi(0)disk(0)rdisk(0)partition(1)\WINDOWS="MP HALMACPI" /noexecute=optin /fastdetect /sos /kernel=ntkrnlmp.exe /hal=halmacpi.dll
multi(0)disk(0)rdisk(0)partition(1)\WINDOWS="MP HALMACPI" /noexecute=optin /fastdetect /sos /kernel=ntkrnlmp.exe /hal=halmacpi.dll
multi(0)disk(0)rdisk(0)partition(1)\WINDOWS="MP HALMPS" /noexecute=optin /fastdetect /sos /kernel=ntkrnlmp.exe /hal=halmps.dll
multi(0)disk(0)rdisk(0)partition(1)\WINDOWS="MP HALSP" /noexecute=optin /fastdetect /sos /kernel=ntkrnlmp.exe /hal=halsp.dll
If you need to use a Physical Address Extension (PAE) kernel such as NTKRPAUP.EXE or NTKRPAMP.EXE, you would have to write lines using those.
In order to find out the correct HAL and kernel combination for the target computer model “B”, you could use one of the following procedures:
- install Windows XP SP2 onto it and compare which
HAL.DLLandNTOSKRNL.EXEyou end up with - boot BartPE and use Microsoft's Sysinternals' Process Explorer
- Highlight the System process
- View → Lower Pane View → DLLs
- View → Show Lower Pane [checked]
- Scroll through the lower pane looking for the proper HAL file and kernel file
- finish the rest of this Etherboot Wiki article and then try every combination until computer model “B” boots

Installing the Target NIC
In order to install the target computer model “B”'s NIC on computer model “A”, you need to capture a registry key from a running Windows XP SP2 on computer model “B” (or an offline copy of its saved registry). You could use BartPE to boot computer model “B” in order to avoid actually installing Windows. If you use BartPE, you do not need to include networking support at all in the BartPE compilation.
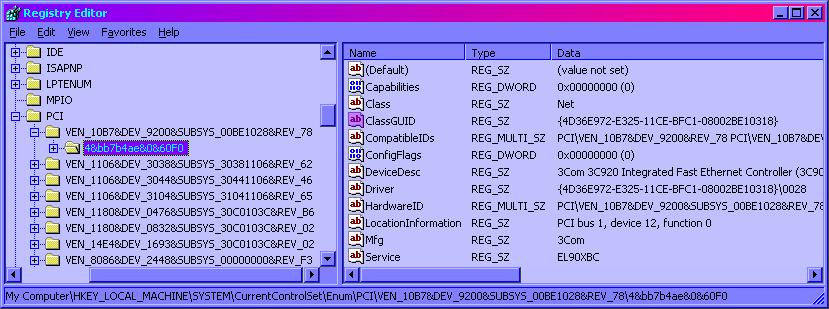
Using computer model “B” and/or its registry, open RegEdit and navigate to the HKEY_LOCAL_MACHINE\SYSTEM\CurrentControlSet\Enum\PCI\ key. Find the subkey corresponding to the target NIC by its PCI VENdor and DEVice ID. If you do not know the PCI VEN and DEV ID, you can try searching for 4D36E972 using Edit → Find…, but be careful that you do not find a wireless interface and that you do not fall outside of CurrentControlSet. Once you have found the correct key corresponding to these IDs, expand it and highlight the subkey, which represents an actual instance of this identified device. The subkey might have a name like 4&bb7b4ae&0&60F0.
Export the key as a .REG file using File → Export…. Copy this file to computer model “A”.
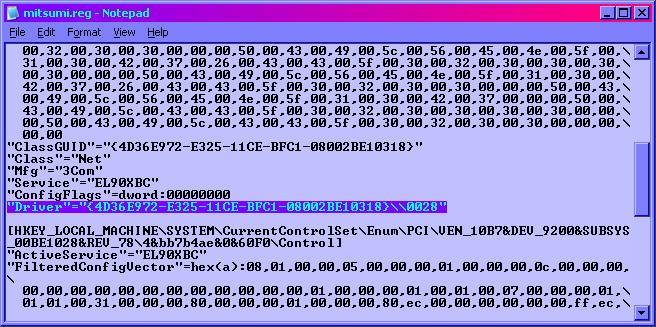
Back on computer model “A”, edit the .REG file you saved from computer model “B” and remove the Driver value:
  00,32,00,30,00,30,00,00,00,50,00,43,00,49,00,5c,00,56,00,45,00,4e,00,5f,00,\
  31,00,30,00,42,00,37,00,26,00,43,00,43,00,5f,00,30,00,32,00,30,00,30,00,30,\
  00,30,00,00,00,50,00,43,00,49,00,5c,00,56,00,45,00,4e,00,5f,00,31,00,30,00,\
  42,00,37,00,26,00,43,00,43,00,5f,00,30,00,32,00,30,00,30,00,00,00,50,00,43,\
  00,49,00,5c,00,56,00,45,00,4e,00,5f,00,31,00,30,00,42,00,37,00,00,00,50,00,\
  43,00,49,00,5c,00,43,00,43,00,5f,00,30,00,32,00,30,00,30,00,30,00,30,00,00,\
  00,50,00,43,00,49,00,5c,00,43,00,43,00,5f,00,30,00,32,00,30,00,30,00,00,00,\
  00,00
"ClassGUID"="{4D36E972-E325-11CE-BFC1-08002BE10318}"
"Class"="Net"
"Mfg"="3Com"
"Service"="EL90XBC"
"ConfigFlags"=dword:00000000
"Driver"="{4D36E972-E325-11CE-BFC1-08002BE10318}\\0028"   <--- DELETE THIS ENTIRE LINE

[HKEY_LOCAL_MACHINE\SYSTEM\CurrentControlSet\Enum\PCI\VEN_10B7&DEV_9200&SUBSYS_00BE1028&REV_78\4&bb7b4ae&0&60F0\Control]
"ActiveService"="EL90XBC"
"FilteredConfigVector"=hex(a):08,01,00,00,05,00,00,00,01,00,00,00,0c,00,00,00,\
  00,00,00,00,00,00,00,00,00,00,00,00,01,00,00,00,01,00,01,00,07,00,00,00,01,\
  01,01,00,31,00,00,00,80,00,00,00,01,00,00,00,80,ec,00,00,00,00,00,00,ff,ec,\
Save the modified .REG with its Driver value deleted. Close your editor.
Get a SYSTEM shell on Windows XP
Then run the following commands:
C:\>time /t
4:54 pm

C:\>at 16:55 /interactive cmd
but replace 16:55 with the 24-hour-format time for the very next minute according to the time. This will schedule a command-line interface to open up that will have SYSTEM account privileges. Please note that if you are using Remote Desktop to connect to computer model “A”, you must use the mstsc.exe /console command-line for Remote Desktop, as the cmd window will only display that way.
A CLI will open with svchost in the title.
Get a SYSTEM shell on Windows 7 and 2008
- Download PSEXEC and unzip it to some folder
- Open a command prompt as Administrator (click Start, type CMD in the search field and press Ctrl-Shift-Enter)
- navigate to the folder where you just unpacked PSEXEC
- run
psexec -i -s -d cmd
- check whether you really are the SYSTEM user
whoami /user
Import REG file
Close any running RegEdit (should you have one) and then run the following command from the svchost CLI:
C:\Windows\System32>regedit
RegEdit will start with the same SYSTEM account privileges. Import the .REG file from wherever it is. Since you are running as the SYSTEM account, don't expect your Desktop or My Documents directories to be the same as your regular account. Close RegEdit. Close the svchost CLI window.
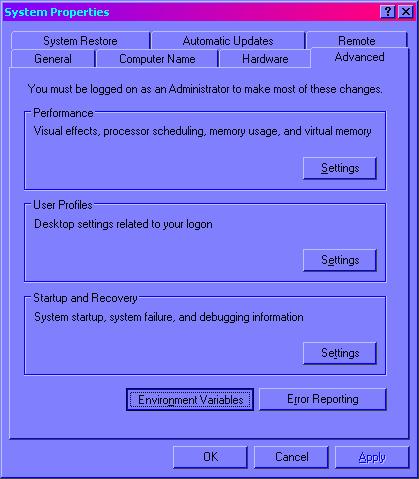
You must enable the devmgr_show_nonpresent_devices variable and set its value to 1. You can do this from here:
or you can run the following command:
C:\>set devmgr_show_nonpresent_devices=1
Now that devmgr_show_nonpresent_devices is set, start Device Manager:
C:\>devmgmt.msc
Choose View → Show hidden devices. Expand the Network Adapters section and search for the target NIC from computer model “B”. It should appear with a faint icon, because that device is obviously not currently attached to computer model “A”. Now choose Action → Update Driver… and go through the installation process for the NIC, choosing the correct driver. Windows will automatically install the partner Packet Scheduler Miniport for the NIC.
If the NIC in computer model “B” is a variation (older or newer version with different PCI ID) of the one in computer model “A” Windows won't show an additional device in the device manager. In this case you'll have to tell Windows it can use the same driver. To do this find the registry key belonging to the NIC in model “B”, double click on the “Driver” value and copy it. Then go to the key for the NIC in computer model “A” and create a new string value called “Driver” with this value.
Conclusion
That's it! Now you're ready to continue on by:
- Installing the MS iSCSI Initiator Boot Version (for SAN-booting via iSCSI)
- Installing the WinAoE driver (for SAN-booting via AoE)
- Installing the iscsiboot driver by mcb30 (for SAN-booting via iSCSI)
- Shutting down computer model “A” and serving its hard disk via either iSCSI or AoE
- SAN-booting computer model “B” to the served hard disk
- Making the HAL & kernel choice for computer model “B” as identified
- Detecting the rest of the hardware for computer model “B” (automatically)


