Table of Contents
Debugging Windows iSCSI boot
To debug Windows iSCSI boot problems, you will need a second Windows machine running windbg, and a null-modem cable to connect the two machines together via their serial ports. The debugging machine does not need to be running the same version of Windows as the iSCSI-booting machine.
This tutorial is designed to help you capture the information that will be needed to diagnose your iSCSI boot problems.
Preparing the machines
Connect the null-modem cable between the serial port of the debugging machine and the serial port of the iSCSI-booting machine. (If one or both of the machines do not have serial ports then you can use a FireWire cable instead, but these instructions assume that you are using a null-modem cable.)
Preparing the tools
Download the latest version of windbg as part of the Debugging Tools for Windows package from http://www.microsoft.com/whdc/devtools/debugging/installx86.mspx and install it onto the debugging machine.
Locate the Microsoft iSCSI initiator (which you have already downloaded and installed on the iSCSI-booting machine), and install it onto the debugging machine.
Preparing the iSCSI-booting machine
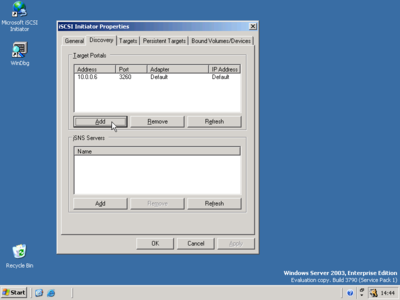
On the debugging machine, start the Microsoft iSCSI Initiator utility (Start → All Programs → Microsoft iSCSI Initiator → Microsoft iSCSI Initiator). Go to the Discovery tab and click on Add to add a new target portal. Enter the IP address or DNS name of your iSCSI target.
Go to the Targets tab. You should see a list of available iSCSI target IQNs. Select the one containing your iSCSI-bootable Windows disk, and click on Log On to connect to the target.
The iSCSI-bootable Windows disk should now show up as an extra drive in My Computer on the debugging machine. Start up Notepad and open the file X:\boot.ini (where X: is the drive letter for the iSCSI-bootable Windows disk). You should see something like
  [boot loader]
  timeout=30
  default=multi(0)disk(0)rdisk(0)partition(1)\WINDOWS
  [operating systems]
  multi(0)disk(0)rdisk(0)partition(1)\WINDOWS="Windows Server 2003" /fastdetect
Duplicate the multi(0)disk(0)rdisk(0)partition(1)… line, and append the options
/debug /debugport=com1 /baudrate=115200 /break
(where com1 is the serial port on the iSCSI-booting machine). The resulting file should look something like
  [boot loader]
  timeout=30
  default=multi(0)disk(0)rdisk(0)partition(1)\WINDOWS
  [operating systems]
  multi(0)disk(0)rdisk(0)partition(1)\WINDOWS="Windows Server 2003" /fastdetect
  multi(0)disk(0)rdisk(0)partition(1)\WINDOWS="Windows Server 2003" /fastdetect /debug /debugport=com1 /baudrate=115200 /break
Save this modified boot.ini file and close Notepad. Go back to the Microsoft iSCSI Initiator utility. On the Targets tab, select the one containing your iSCSI-bootable Windows disk, and click on Details. Tick the box next to the session identifier (which will be a long hex string such as ffffffff810ca00c-4000013700000001), and click on Log off to disconnect from the target.
Starting the iSCSI-booting machine
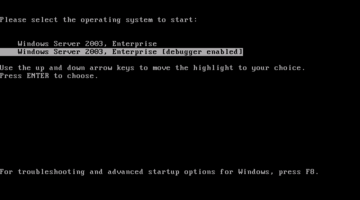
Switch on the iSCSI-booting machine. You should reach the Windows boot menu offering you a choice such as
  Please select the operating system to start:

      Windows Server 2003
      Windows Server 2003 [debugger enabled]
Select the option which includes “[debugger enabled]”, and press Enter to continue. You should see the screen go black, and the machine will appear to have frozen. This is because it is waiting to be controlled by the debugging machine.
Using the debugger
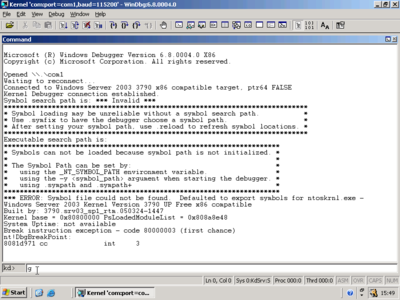
On the debugging machine, start the Windows debugger (Start → All Programs → Debugging Tools for Windows → WinDbg). Start a kernel debugging session (File → Kernel Debug). After a brief pause, you should see several messages appear, ending with
  Break instruction exception - code 80000003 (first chance)
  nt!DbgBreakPoint:
  8081d971 cc              int     3
Allow the iSCSI-booting machine to continue using Debug → Go. After several seconds, you should see iSCSI boot messages start to appear. For a successful boot, these will look something like
  IscsiBP-IscsiBPInitialize: enter
  IscsiBP iBF table found at FC564950 (FC545000)
  IscsiBP iBF table copied to E12B9A08
  IscsiBP Found device \??\PCI#VEN_10EC&DEV_8139&SUBSYS_00000000&REV_20#3&13c0b0c5&0&18#{cac88484-7515-4c03-82e6-71a87abac361}
  IscsiBP Handle 800000B4 has IpAddress 10.254.254.15
  Subnetmask Prefix - 24 is 00 ff ff ff ff ff 00 00 00 00 00 00 00 00 00 00
  IscsiBP Handle 800000B4 has SubnetMask 255.255.255.0
  IscsiBP Handle 800000B4 has DefaultGateway 10.254.254.2
  IscsiBP nic 0 config -> 0
  IscsiBP-IscsiBPInitialize: exit
  Found iSCSI Boot Parameters at 810CABA0, attempting iSCSI boot
  Allocating the Boot Connection Pool of size 30
  Allocating Connection Pool 810C5F10
  Allocating the Boot Connection Pool entry 0 SUCCESS
  Allocating the Boot Connection Pool entry 1 SUCCESS
  ...
  Waiting 60 seconds for boot disk
  iSpSystemWorkerThread: Entering
  iSpSystemWorkerThread:  Coming out of wait
  iSpSystemWorkerThread: Start Logon Completion Thread 810C7008
  Delay 10 seconds for Disk to arrive.......
  iSpSystemWorkerThread:  After Logon Completion Thread
  Delay for Disk Complete, continue with boot
  NIC device \??\PCI#VEN_10EC&DEV_8139&SUBSYS_00000000&REV_20#3&13c0b0c5&0&18#{cac88484-7515-4c03-82e6-71a87abac361} has PCI bus type
  ISCSI Boot Status 0, (0, 0, 0, 0)
If you are using sanbootconf then a successful boot will look something like
  iSCSI Boot Parameter Driver initialising
  Found iBFT at 9cfb0 OEM ID "FENSYS" OEM table ID "gPXE"
  Found iBFT Initiator 0:
    Flags = 0x3, valid, boot selected
    iSNS = 0.0.0.0
    SLP = 0.0.0.0
    Radius = 0.0.0.0, 0.0.0.0
    Name = iqn.2000-01.org.etherboot:host_10_0_0_90.home
  Found iBFT NIC 0:
    Flags = 0x3, valid, boot selected
    IP = 10.0.0.90/24
    Origin = 0
    Gateway = 10.0.0.6
    DNS = 10.0.0.6, 0.0.0.0
    DHCP = 0.0.0.0
    VLAN = 0000
    MAC = 52:54:00:33:22:11
    PCI = 00:03.0
    Hostname = host_10_0_0_90.home
  Found NIC with MAC address 52:54:00:33:22:11 at "\??\PCI#VEN_10EC&DEV_8139&SUBSYS_00000000&REV_20#3&13c0b0c5&0&18#{ad498944-762f-11d0-8dcb-00c04fc3358c}\{7C0E3A80-E8E7-4B81-933E-C997BF973430}"
  iBFT NIC 0 is interface "\??\PCI#VEN_10EC&DEV_8139&SUBSYS_00000000&REV_20#3&13c0b0c5&0&18#{ad498944-762f-11d0-8dcb-00c04fc3358c}\{7C0E3A80-E8E7-4B81-933E-C997BF973430}"
  iBFT NIC 0 is PDO 8124DCF8
  iBFT NIC 0 is NetCfgInstanceId "{7C0E3A80-E8E7-4B81-933E-C997BF973430}"
  Found iBFT target 0:
    Flags = 0x3, valid, boot selected
    IP = 10.0.0.6
    Port = 3260
    LUN = 0000-0000-0000-0000
    CHAP type = 0 (None)
    NIC = 0
    Name = iqn.2006-05.home.dolphin:winxp
    CHAP name =
    CHAP secret =
    Reverse CHAP name =
    Reverse CHAP secret =
  iSCSI Boot Parameter Driver initialisation complete
  iSCSI boot parameters requested
  iSCSI boot parameters requested
  Found iSCSI Boot Parameters at 81208008, attempting iSCSI boot
  Allocating the Boot Connection Pool of size 30
  Allocating Connection Pool 81205850
  Allocating the Boot Connection Pool entry 0 SUCCESS
  Allocating the Boot Connection Pool entry 1 SUCCESS
  ...
  Waiting 60 seconds for boot disk
  iSpSystemWorkerThread: Entering
  iSpSystemWorkerThread:  Coming out of wait
  iSpSystemWorkerThread: Start Logon Completion Thread 81205008
  Delay 10 seconds for Disk to arrive.......
  iSpSystemWorkerThread:  After Logon Completion Thread
  Will notify BusChangeDetected
  Delay for Disk Complete, continue with boot
  ISCSI Boot Status 0, (0, 0, 0, 0)
For an unsuccessful boot, the messages will end with a “Bugcheck Analysis”; this is the debugging equivalent of the Blue Screen of Death that occurs when the debugger is not attached.
Using the output from the debugger
Save the debugging transcript to a file using Edit → Write Window Text to File.
You can e-mail the saved debugging transcript to etherboot-discuss@lists.sourceforge.net, along with any other information that you think may be relevant. Please note that the debugging transcript is the most important information; if you provide a full description of your setup and your problem, but do not provide the debugging transcript, then we will probably not be able to solve your problem.
You can also often find us in the #etherboot IRC channel on FreeNode.
Common problems
- Did you download and install the special boot-capable Microsoft iSCSI initiator as documented in Adding iSCSI boot support to Microsoft Windows? If you installed the standard (non-boot-capable) Microsoft iSCSI initiator, then you will not be able to boot via iSCSI.
- Did you install the checked build (the file ending in -x86chk.exe)? If you installed the free build (the file ending in -x86fre.exe, then you may not see any diagnostic messages.
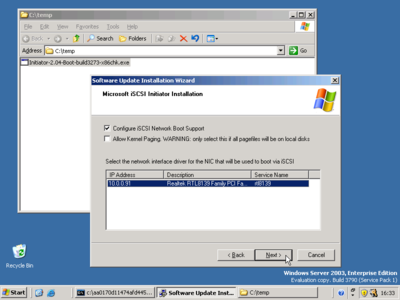
- When you installed the boot-capable Microsoft iSCSI initiator, did you tick the option to “Configure iSCSI Network Boot Support” and select the correct network card to be used for iSCSI boot? 1)
- If you are using Windows XP, did you download and install sanbootconf in addition to the boot-capable Microsoft iSCSI initiator?
- If you are using iSCSI CHAP authentication, are all passwords at least 12 characters long? (The Microsoft iSCSI initiator will refuse to attempt authentication with shorter passwords.)
- Norton Internet Security's (at least 2009 and 2010) firewall is known to cause boot-time problems on XP. Disable the firewall before transferring your disk image to the iSCSI server.
VMware-specific problems
VMware has a nasty habit of changing the PCI bus:dev.fn number assigned to the virtual NIC, which breaks the Windows driver bindings and so prevents a successful iSCSI boot. In most cases, you should ensure that the .vmx file for the VM that you are attempting to boot via iSCSI contains
scsi0.present = "TRUE"
even though there is no local hard disk attached.2)
Other useful techniques
Displaying the boot driver list
The Windows Sysinternals LoadOrd.exe utility can be used to produce a list of boot drivers on your system, which should look something like:
Start Group                  Tag  Service   Display Name
~~~~+~~~~~~~~~~~~~~~~~~~~~~~+~~~~+~~~~~~~~~+~~~~~~~~~~~~
Boot Boot Bus Extender       1    ACPI      Microsoft ACPI Driver
Boot Boot Bus Extender       2    PCI       PCI Bus Driver
Boot Boot Bus Extender       3    isapnp    PnP ISA/EISA Bus Driver
Boot Boot Bus Extender       5    ACPIEC    Microsoft Embedded Controller Driver
Boot System Bus Extender     6    Compbatt  Microsoft Composite Battery Driver
Boot System Bus Extender     4    IntelIde
Boot System Bus Extender     1    Pcmcia
Boot System Bus Extender     8    MountMgr  Mount Point Manager
Boot System Bus Extender     9    Ftdisk    Volume Manager Driver
Boot System Bus Extender     12   dmload
Boot System Bus Extender     13   dmio      Logical Disk Manager Driver
Boot System Bus Extender     5*   PartMgr   Partition Manager
Boot System Bus Extender     n/a* VolSnap
Boot NDIS Wrapper            n/a* NDIS      NDIS System Driver
Boot NDIS                    13   E1000     Intel(R) PRO/1000 Adapter Driver
Boot Base                    1    KSecDD
Boot Base                    20   iscsiboot
Boot PNP_TDI                 5    IPSec     IPSEC driver
Boot PNP_TDI                 3    Gpc       Generic Packet Classifier
Boot PNP_TDI                 4    Tcpip     TCP/IP Protocol Driver
Boot PNP_TDI                 7    PSched    QoS Packet Scheduler
Boot SCSI miniport           25   atapi     Standard IDE/ESDI Hard Disk Controller
Boot SCSI Class              2    Disk      Disk Driver
Boot FSFilter Infrastructure 1    FltMgr    FltMgr
Boot Filter                  n/a* PxHelp20  PxHelp20
Boot n/a*                    n/a* BTKRNL    Bluetooth Protocol Stack
Boot n/a*                    n/a* iScsiPrt  iScsiPort Driver
Boot Network*                2*   Mup       Mup
Boot n/a*                    n/a* ohci1394  Texas Instruments OHCI Compliant IEEE 1394 Host Controller
You need to run LoadOrd.exe on the system that you will attempt to boot via iSCSI, before transferring the disk image to the iSCSI target.
scsi0.present="TRUE"you can force VMware to create a hard disk controller (with no disks attached) as PCI device 00:10.0 and so reassign the NIC as PCI device 00:11.0, which is where Windows expects to find it.


