Table of Contents
Deploying to a USB device while keeping storage capabilities
As stated here you can place gPXE on a USB drive, unfortunately, the standard procedure will render your USB device unusable for any other purpose. The intention of this guide is to walk you through the process of deploying gPXE to a USB device and be able to still use it as storage media.
Note: This guide is a walkthrough for Mac OS X 10.5, also it uses BKO instead of gPXE, still I believe the process would be similar in Linux and/or for gPXE.
Important: Backup the data on your USB drive, as you WILL lose it in this process.
1. Downloading
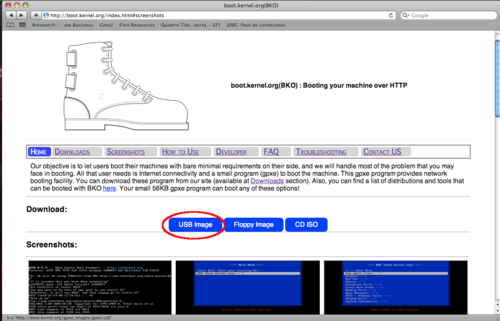
Download BKO's image for USB
2. Preparing the USB device
Getting the device ready for deployment is not trivial in Leopard, as the OS mounts it to the desktop and the context menu removes it from the system. These few steps will prepare the USB device for deployment:
- Launch Disk Utility
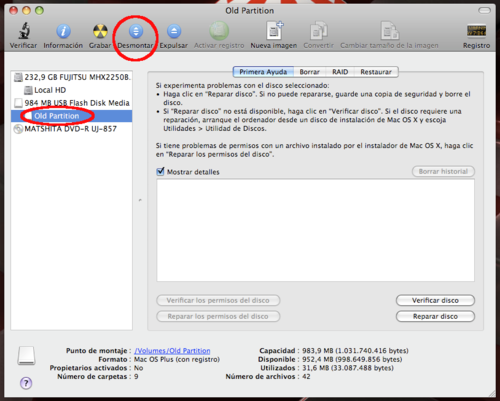
- Select the partition(s) in the device and click the “unmount” button from the toolbar
- Now the device is ready, but first you need to identify your device. Select the USB device from the left menu and click the “info” button from the toolbar.
- The name besides “Disk Identifier” is the one you'll need to locate your device under the
/devdirectory - In the case depicted above the Disk Identifier is disk1, so the device would be
/dev/disk1, that's the device name we'll use for the rest of the tutorial, adapt to whatever your disk identifier is.
3. Deploying BKO
To deploy BKO to your USB drive, fire up Terminal and cd to the directory where you downloaded it. Deploy it by using
dd if=gpxe.usb of=dev/disk1
Remember to substitute disk1 for your own disk identifier.
If you're deploying a generic gPXE, just follow the instructions under Using removable media
4. Recovering your storage space
At the moment, your BKO/gPXE should be up and ready, feel free to try it out. Nevertheless you will find that you're using your whole USB drive for a tool that uses barely 2MB of space. We will be redefining the partition table so we can use the remaining space. There is a screenshot of this process below.
- From Terminal, launch the fdisk utility in interactive mode by using:
fdisk -e /dev/disk1
- Once fdisk starts, the prompt should look like:
fdisk: 1>
- Issue the print command to get a preview of the partition table.
fdisk: 1> print
- BKO is installed on the forth partition, note the size of the partition for you will need that number in the next step.
- Edit the first partition to be able to use it for storage.
fdisk: 1> edit 1
- First you will be asked for the partition's id, enter
0B, that is the code for the Win95 FAT-32 filesystem. - Then you will be asked if you want to edit in CHS (cylinder, head, sector) mode, say
nounless you know what you're doing. - When prompted for the partition offset, enter the size of BKO's partition, that is the number referred on step 3.
- Last you will be asked for the partition's size, leave the default value.
- Issue the print command again to make sure the changes have been made.
fdisk: 1> edit 1
- Write the changes to the disk by issuing the write command.
fdisk: 1> write
- Exit fdisk.
fdisk: 1> quit
5. Give format to your new partition
Now you will have your BKO/gPXE working and a separate partition for your storage, but Leopard still won't recognize the new partition, you need to format it.
- Launch Disk Utility.
- Select disk1s1 under the USB device on the left menu.
- Navigate to the “erase” tab.
- Select MS-DOS (FAT) as the partition's format, set the partition's name and click the “erase…” button.
You're all set! now your BKO/gPXE is working and you can still use your USB device as a storage media.
— Jorge Rodriguez García (A.K.A. Tiriel) 2009/09/24 16:57


